Tuesday, December 25, 2012

Comprehension Skill Posters Continued

I posted earlier a comprehension skill poster for sequence of events related to solitaire. Now that I have returned from maternity leave I have created more fun posters!!

This was the poster that I saw online that started the whole idea!

Students truly understand fun games, so I thought, take old/new games they understand and compare them to reading skills they need to learn. Many games really do support comprehension and reading skills!

I let the students play the games during UA time, and I find that it does help their language skills, and helps them remember the skill better!

100%

I love to celebrate learning. One of the things I do to celebrate the best, is to display the best! I always hang 100% papers. I have found that once a student (who may think a 100% is impossible) becomes so proud!! It really is overwhelming to see how amazing they feel!

Making Accelerated Reader Fun!

Every year I have posted and made AR fun! I find that the best thing to do is to post it fun first. This year I cut out mickey heads and laminated them, so I could change the students points each week with a whiteboard marker. I find that the students compete against each other, and keep each other reading.

I also give prizes for word count. At 200,000 words, the students receive a prize from my prize box. At 500,000 words they receive a Homework pass, at 1,000,000 words I give them a free book, and at 2,000,000 words I take them to a movie. Usually, only 1 or 2 kids get to the top prize. It is fun to see the students reach even the prize box, and they are excited!

Finally, once the students reach ten 100%'s on quizzes they get a trip to the star jar, which is all free to me! They have stars like "sit in the teachers chair for 15 minutes," "15 minutes of drawing them," or "15 minutes of computer time." These are highly sought after stars!

Double Waterfall Braid

Over Thanksgiving, I was able to braid my sister-in-laws hair. Oh man, do I love to braid.

I started with a simple waterfall braid.

1) Break a small part of the hair on one side into three pieces.
2) When you begin the braid start with grabbing another piece from the top of the head.
3) Drop the bottom piece and pick up a new section of hair to keep the third piece of the braid

Then I looped the braid around and the pieces that was dropped, were picked up as the top part of the braid. And new pieces were dropped to create a double waterfall effect.

It was fun to braid again!

Revolutionary War Unit Basics

My favorite unit in 5th grade is studying about the Revolutionary War. I find that my students love it because it is interactive and interesting. I have an entire unit based on the war. Of course, I have help because Houghton-Mifflin has an entire theme based on the Revolutionary War. I use their stories and work on their comprehension skills, and begin to teach the unit. However, I have an interactive unit that my friend and I created the first year I taught 5th grade. She is amazing, and has updated it, so that I could use it since I was busy having a baby earlier this year!

The students are assigned a character in history, and a colony. I always play King George III/Historian. The students then research the colonies and their characters.

This was the first year I had iPads to research, and it was a bit too much fun! The students had specific questions to ask, so they could truly participate in the continental congresses knowing how their colonies thought. They also researched their person, so they knew when to participate in the interact.

For example, Patrick Henry gave his famous speech, John Adams led the Boston Tea Party, and Paul Revere read the Midnight Ride of Paul Revere.


1.     King George
Revolutionary War
1.     Patrick Henry
2.     John Adams
3.     Abigail Adams
4.     Benjamin Franklin
5.     Joseph Galloway
6.     John Hancock
7.     Nathanael Greene
8.     Ethan Allen
9.     Thomas Paine
10. Thomas Jefferson
11. Crispus Attucks
12. Paul Revere
13. George Washington
14. Phyllis Wheatley
15. James Wilson
16. James Madison
17. John Jay
18. Benedict Arnold
19. Nathan Hale
20. George Rogers Clark
21. John Penn
22. General Charles Cornwallis
23. Sybil Ludington
24. Mary Ludwig Hayes
25. Richard Henry Lee
26. John Paul Jones
27. Henry Knox
28. Samuel Adams
29. William Prescott
30. John Dickinson
31. James Wilson
32. Thomas McKean

The students were also in charge of doing a research report based on their person, and during computer time, they would research and fill out basic questions from their early life, revolutionary war, and after the revolutionary war. They also wrote a report on the person during writing time.

After researching the colony, the first interactive thing we did was discuss the 7 Years War, which began the taxes. We did a small section of reading based on the war from our social studies book. 

Then, letting the students sit by colonies, "King George III" came in and proclaimed the different taxes from the Revolutionary War. The students of course went into an uproar. Also, we re-inacted the Boston Massacre. For the Boston Tea Party, I found a small play to do with the kids, and they re-inacted the Boston Tea Party. Then we would begin the 1st Continental Congress, and would vote on the three things the actual congress voted for.

Patrick Henry gave his speech, and Paul Revere talked about his Midnight ride. While the students read their parts the rest of the students drew parts they heard on the "Draw Free" app on the iPad. I found that this kept the students interactive.

Finally, we read about Lexington and Concord in our Social Studies book, and break into colonies to vote for in the Second Continental Congress. We form an army and petition King George, and discuss the Olive Branch Petition. After we discuss the Petition, we declare independence, and the war begins.

The last thing we do is discuss propaganda and the role it played in the war. This is my favorite part! We look at Benjamin Franklin's "Join or Die" art work, as well as the Boston Massacre propaganda that occurred in a newspaper. Then I let the kids create their own artwork, pretending they are artists during that time.

After the students have finished their research report (which they are working on the whole time), they do a presentation based on their person. I will talk more about that during my presentation blog!


Here are the final posters:


5 Minute Review

In 5th grade, one of the many jobs I have before sending kids to middle school is to teach them how to study. The day before a test we fill out a review sheet based on whatever we have learned. I usually give them 5-7 different ways to study at home, and we practice them while we fill out the sheet. The most popular ways to study:

1) Write it, Read it, Say it
     *Simple yet effective
2) Make a chant/song
3) Make hand movements
4) Test each other
     *What I will focus on!
5) Assign colors to things we have to memorize
6) Draw a picture of what we need to memorize
7) Think of examples

The day of the test, after the students have reviewed at home, I like to start the day off with a quick review.

1) I assign a part of the review guide to each student to "test" the other students on.
2) They have 5 minutes to walk around and "test" as many people as possible.
3) During the 5 minutes, they walk up to a person, they ask their question, and have it answered, then the other partner asks their question, and they answer it.
4) Then, they give the person a high five. They check off how many people to ask.
5) The winner receives a clip move/class dojo points/whatever a fitting reward for your classroom would be!

The students really get into it, and they are studying! It is quite fun!


Wednesday, October 31, 2012

Natalie's First Halloween

My husband is a huge Halloween lover. I, on the other hand, am not terribly fond of Halloween. I do not like being scared. My husband and our neighbor get together every year and frighten kids, they have a bit too much fun. However, I like to eat candy and dress up. Natalie will be dressing up, of course, and I got a great idea from pinterest to do a cookie monster costume! I hope Natalie will like my version of Halloween better, but for now it is too early to tell.

For now, I will show off my cute costume that I made for her!

1) I made a no-sew tutu, which is all over Pinterest and google.
   *I sewed together elastic to fit Natalie.
   *Then cut the blue tule into long strips (double the size you actually want the skirt to be).
   *Then folded one strip in half and looped it around the elastic. Keep doing this until the elastic is hidden.
   *Finally, I wrapped the black ribbon around the elastic and each strip of tule, and tied it into a bow.
   *There are better directions on google and Pinterest. But, these are simple directions


2) Cut out the felt!
   *First I used a glass to trace the whites of his eyes, and cut it out, then guess-timated the black pupils.
   *Then I cut his mouth out, and the cookies with chips. All of this was guess-timated to make it look more realistic.

3) Sew the felt on!
   *I sewed the first cookie onto the plain white onesie.
   *Then, I sewed the eyes, mouth, and cookies onto the tule. I had to be careful not to sew the front of the tule to the back of the tule.
   *To make life easier I sewed the chips, cookie, and tule together, so that I did not have to sew each thing individually.

The skirt was super cute on her last night, I am waiting till Halloween to put the whole costume on her!

All in all, it took about an hour. Half hour for the skirt and half hour for the felt and sewing.


Tuesday, October 16, 2012

Natalie's photo shoot

As I nurse my daughter, I want to be a proud momma and show off my awesome daughter & her gorgeous pictures! I can also give some tips on how to take a good picture! After our photo shoot we learned a lot!

1) Nurse or feed before the photographer comes. This will calm your baby down, or put them to sleep, making it easier for the photographer. 
    *We had to learn this the hard way, and feed her half way through the session because she was cranky!
<-- After the feeding!

2) Have a pacifier nearby.  This helped our baby calm down, but we did have pacifiers in the pictures. So, make sure the pacifier is something you wouldn't mind seeing in the pictures!


3) Swaddle! We made some pictures work by putting her in a swaddle.
4) Stick with a white onesie. We tried to change her over and over again, and realized that made it harder for her. Putting her in one white onesie then adding decorations made it easier!  
   *One of our changing sessions, she was calm before we tried to change her again!

5) Last but not least - go with the flow & have fun!!


Sunday, August 26, 2012

Understanding our Geography

Many students struggle with geography, and understanding how our universe works.

Here is a foldable, that can help them understand and remember the different parts of our worlds. To make this foldable:
1) Fold the white paper into fourths.
2) Cut three slits, one in the middle, and the other two half way between the middle and bottom and middle and top, in the middle two folds
3) Cut the green paper into two strips, that fit 1 fold.
4) Weave the first green paper over and under, and the second green paper under and over.

The best part about this foldable, is that the students can test themselves because the answers on are the other side like the pictures to the right. If you fold the paper in half, and grab at the two side folds, you can write the answers on the backs! It is quite handy, if you want to study!

This is the example I did for the class, and they were fun to make! However, it does take time.

Integrity

Like I said before, my first year teaching, my friend taught me so much! Here is another project she does, that I "borrowed."

Integrity is when you match your values with your behaviors. In order to get my students to understand what they valued, I had them think about what they cared about. I had them trace their hands, and write on their traced hands, what they valued. We cut out our hands and put them to the side.

Then I talked to them about what they do to show their values love, meaning what actions do we take to show what we value. They traced their other hand, and wrote their actions on the other hand. Then we glued the hands to match up the values with their actions.

It was fun to see the students think about what they valued, and how they show they cared for it. Now, our values match our behaviors.

Responses

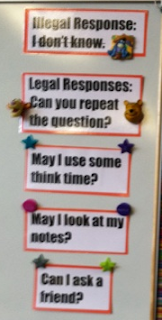
My first year teaching, I had the incredible experience of teaching with someone who I looked up to greatly! She taught me so much about excellent teaching practices. This was one of my favorites!

I found that this was one of the best ways to make students learn how to use their brains, and actually respond to questions even if they weren't ready to be "called on." It also allows my students, to not give up, and give the stock answer "I don't know," even if they really know the answer the question - or just need time.

The first response allows students to hear the question again, if they either couldn't hear it, or just need time to process what was said.

The second response allows students to think about the question, and I have found that the rest of my class will think about it too. 

The third response allows the students to use the notes they have already written, and gives them a second chance to review, which is always great because it means they can use their notes to study from later!

Finally, my student's favorite, "Can I ask a friend?". There are 2 parts to this response. The students ask a friend (part 1), but they have to either repeat, or rephrase what their friend said in their own words (part 2). This way you know they are listening to they answer, and have at least processed it through their brain. If they cannot hear the answer, or just need it repeated, they say, "Can you repeat what you said?" I have found that this is the BEST way to get my students to listen to each other, which can be a struggle at times!

I love these responses because it does not allow my students to give up, and they have to try with every question, and pay attention to every question. At first it is tough because some of the students are apprehensive, but once the rules have been established they thrive!


Sunday, August 19, 2012

Comprehension Skills related to Board Games

After teaching fourth and fifth grade for two years now, I wanted to change up how I taught comprehension skills from Houghton-Mifflin. I decided this year, I wanted to relate the skills to board games, after finding a post on pinterest based on cause and effect relating to angry birds. 

Here is my first poster. The blanks are: "Everything goes in order." I figured solitaire was a good reference because the cards have to go in order if you want to win the game. I will post more posters as the school year progresses... Here are a few previews: Jenga for predicting outcomes, Clue for inferences, and Apples to Apples for author's viewpoint. I hope you enjoy the ideas!


Natalie's Nursery

I finally finished Natalie's ABC project, and I needed to finish her nursery! Especially since her due date is only 3 weeks again. My family came down from my hometown, and we got to work this weekend, and the nursery is now complete, and I am complete thrilled with how it looks!


We went with a book theme - what else would a teacher do!

In the first picture, I used book covers and cut them out and framed them.

In the second picture, my husband and I got a sticker quote, it is from Dr. Seuss, "Oh the Places You'll Go."

In the third picture, I got stuffed animals from many different places, and books instead of cards from friends at the two baby showers I had.

In the fourth picture, my husband and I found Hungry Caterpillar stickers from ebay.

Finally, the last photo, I found the rocking chair at Goodwill, and my husband awesomely stained it!

I am very happy with our book themed room!!


Sunday, July 22, 2012

ABC Infant Toys

Sewing has become my new passion. This next project will take awhile to finish; however, it is easy to put down and come back to in between projects since you feel accomplished after completing one letter.

Since I wanted the toys to be the same size, I made a stencil on Word, and used Word Art. It was nice because I could choose my own font, and modify the size as needed.

Then, I had to cut out the stencils, which took quite a while, but well worth it!

Next, I pinned the stencils onto two pieces fabric right sides facing out.

I traced the stencil, then cut about a half inch outside the tracing.

After that, I took out the pins and stencil, and re-pinned just the fabric, and sewed on the tracing on the stencil leaving a small piece of the two fabrics open, so I could stuff the letter.

Once the stuffing was in, I could close up the letter.


After the letter was completely sewn I could trim the excess fabric.

After completing the letter A, I moved to B, then C! I am currently finished with F, and hope to do all the letters before I pop!


Tuesday, July 17, 2012

Onesie Dress

My sewing machine is becoming my new best friend. At my family baby shower, my mom bought a bunch of white onesies for people to decorate. However, there were still tons left over, I took them home, and thought they would come into use and some point. Well, I found the use! I made a white onesie into a cute dress!

I used a 3 months onesie. The front measured to 14 inches around, and 10 inches long from where I wanted to sew. So, I cut a square out of the fabric that was 21 inches long and 12 inches long. I made it longer than it needed to be, so I could account for hems. The first thing I did was sew the hem for the left, right, and bottom, of the skirt.

Once the hem was straight and sewn to perfection, I pinned the pleats around the top as shown in the picture, from the section that was not hemmed (since it wouldn't be seen). Every inch and a half I pinned a new pleat.

Then I sewed it to the onesies, but slipping the onesie and dress over the sewing machine.

Once that was complete it was time to sew the blue band to the dress!

I cut the band to be 3 inches wide and 15 inches long, so it would over lap in the back. Next I did the hem to make a straight line. Then I pinned it over the pleats, and sewed it to the onesie. And voila - a dress!

It is quite cute! And the best part was that it was from scrap fabric from the sling I just made, and the curtains I completed!


What I learned after my baby was born: USE STRETCHY FABRIC! Not sure if it will work the same, but the dress sadly did not fit over her head. I will try again with stretchy fabric to see if I get the same results!

Saturday, July 14, 2012

Curtains

After the sling project, I knew I needed to hone in my sewing skills. Basically, I became addicted to sewing. My sister is coming to be the live-in nanny when my baby girl is here, and she is living in the loft. Our loft has a big hole in it - that is supposed to be a window to the living room. However, I don't think she wants to be changing up stairs if others are downstairs! So, I needed to make the room curtains.

First I measured the size of the window, which was 48 inches tall and 8 feet long. The fabric I bought was 44 inches long, so I needed to do three blocks of curtains instead of two. I cut the fabric to be ten inches longer than I needed.

Then I cut the plain navy blue which would be the back of the curtains.

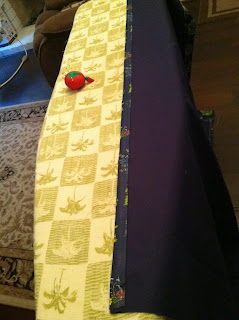
Once that I was completed, I took the first block of blue and floral print, and ironed the left side 1/2 an inch, and pinned it. Then I ironed the hem of the top 1/2 an inch, and then folded the hem over 3 inches, ironed it, and pinned in. Once the pinning and ironing was done, I sewed the two sides.
Then you cut the excess fabric on the other sides, and repeat the last step again on the other side.

After creating 3 pieces, the final project looked like this!


Sling

After many attempts at crafting with the hot glue gun, it was time to focus on my sewing projects. I started with the project that needed to get done first, since I will use it frequently with my little girl - the sling.

First and for most I used the McCall's pattern for the sling. I will not give everything away here, since I'm sure McCall's will prefer that not give away their pattern. But, I will show you pictures of the sling, and some of the steps I took.

First I used 1 3/4 yards of fabric, and pinned the pattern, and cut it out twice (so don't put the pattern in the middle of the fabric like I did the first time, and had to subsequently buy more fabric).
Chloe seriously loves to help with my projects. What a silly puppy!


Once everything was cut out, I put the wrong sides out and sewed the sides, except for one small section, so I could flip it to the right side when you are done sewing.

Then I sewed together the rounded edges as well. Then flipped the fabric around.

Once the fabric was flipped around, I slip stitched the rounded edges together to make the sling complete.


Finally, my sling was complete!! Now I just need my baby girl to arrive, so I can use it! :)


Friday, July 6, 2012

Ribbon Cards

Summer has been fun! My husband and I have been been working hard to prepare for our soon to be baby. We are getting house projects done, and baby projects done as well.

Before all the projects began I went to Hawaii to visit my best friend (as I have mentioned before). She had a huge mold problem, and was afraid to hang special photos, so she decided to display her cards in a super cute way! She put ribbons up with push-pins and hung the cards on the ribbon. I have saved all my special cards from the last few years, and decided to display just like hers! Here is the finished product:


In order to make this the first thing I did was make the push-pins a bit more exciting by super glueing $1 bin flowers from Michaels.


Then I hung the ribbon in the hallway. I used thick ribbon, and actually hung it up straight first, because the weight of the cards make it dip.

Then I hung the cards, and paper clipped the cards folded long way. It was simple, and lit up the hallway!

Well, time for my next craft!

Tuesday, June 26, 2012

Ribbon Frame

This summer has been a whirl wind of fun! Once school was out, I was quickly whisked away on a plane to visit my best friend in Hawaii. Needless to say, it was a blast! After a few days of unpacking (which I still need to finish) and rest, I went up to my hometown for my family baby shower. Now, I am home, and finally ready to craft! I started my first craft today, so that I could better organize my favorite, decorative hair pins.

After scouring pinterest, I found a craft I wanted to recreate. The frame with the back taken out and replaced with ribbon. The final product looked like this:

Here are the steps I took:
1) I took out the back of the frame, the glass, and whatever was left over.


2) I used a hot glue gun to hot glue the ribbon onto the back of the frame. 


3) After glueing on four ribbons I was done!


It was truly simple. Probably the easiest craft I have ever done.

Then I hung it in my bathroom and added my hair pins!

Seriously adorable and made my day! I have more room to buy more hair pins - won't my husband be excited for that...

Saturday, April 21, 2012

Curious George Blanket

We are about to hit the 20 week part on Wednesday, and I have realized that I have not posted a single project that I have accomplished yet! Though my husband and I have been busy, so here goes Project 1: The Baby Blanket.

Now, I have sewed in my lifetime, but I haven't sewed in, let's say a few years. So, sewing something seemed like a daunting project for my first undertaking. Then, I remembered the "No Sew" quilts my Mom used to make as Christmas presents. They were always well loved.

We have decided to go with a book theme for the nursery, and we have found some cute things. However, we struggled to find the perfect Curious George addition (we wanted a shelf and cute stickers, but the stickers were just too small). Until, we found the perfect fabric!


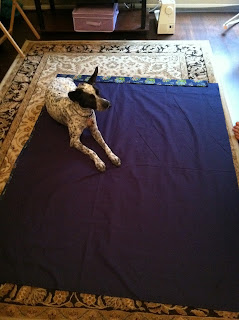
As you can see my dog, Chloe, wanted to help design the quilt as well! 

Here are the step for the simple "no sew" quilt:

1) Buy 2 colors of flannel fabric. I bought 1 yard for the baby blanket. I think my mom always bought 2 yards for an adult sized blanket.

2) You lie the two fabrics on top of each other, evenly.

3) You cut four squares at each of the corners about 3-4 inches deeps (depending on how long you want your strips to be).

4) Then you cut strips about 2 inches long and 3-4 inches deep (depending on how long you cut your squares).

5) Then you tie the strips from the two different fabrics together!


My final product looked like this. It took me about an hour - not too bad at all!